I am not a huge fan of Vanilla Slice from the bakery, not because it isn’t nice, indeed it is very nice. It is also difficult to eat, that is what makes me choose something else every time. I have never met a vanilla slice that is easy to eat, it always squishes its custard filling out all over the place making you look like you have been eating by yourself for about 9 minutes…unsuccessfully. This one is no exception, its saving grace was that I could eat it at home and not worry about the impression I was making on those around me. I was happy that it tasted as good as its bakery counterparts although I would use less icing in future, I will make it again as long as I can eat it quietly at home without others.
I let mine sit for a good 24 hours prior to consuming. I thought this might make the pastry a little easier to deal with but not really…
Enjoy!
Vanilla Slice
2 sheets puff pastry
½ cup caster sugar
½ cup custard powder
1½ cups cream
2-2½ cups milk
1 teaspoon vanilla
Icing
2 cups icing sugar
1 teaspoon butter
1 teaspoon vanilla
Hot water
Place puff pastry on lined oven tray. Prick with a fork and bake for 10-15 minutes at 220°C.
Put sugar, custard powder and cream into a saucepan and stir over a medium heat until it starts to thicken.
Add milk ½ a cup at a time and whisk continuously until the custard is thick.
Let everything cool slightly.
Place in a 22 cm square tin, pastry, custard, pastry then icing.
Icing: Place icing sugar, butter and vanilla in a bowl and add enough hot water to make
thin to medium textured icing.
Recipe notes
Best after 12-24 hours in the refrigerator but can be eaten in as little as 3 hours.
So, after making cannelloni the other day I had a truck load of ricotta cheese (larger than needed quantity purchased on special) and a keen interest in finding something to use it up before it went bad. Side note: you can freeze ricotta as long as you intend to cook it in/with something, the texture isn’t great for eating alone once frozen and defrosted (people do that?).
I did a search through my database and came up with this little gem. I knew there was a bottle of maple syrup somewhere in the back of the cupboard and luckily for me it contained just the right amount for this recipe. This dessert is very much like a crème caramel but has (due to the ricotta) a grainier, more rustic, appearance and texture. It was very tasty though and certainly worth a try if you are a ricotta fan or you just have a truck load lying about going begging for something to do.
Maple Ricotta Flans
1/4 cup plus 1 tsp pure maple syrup
4 beaten eggs
425g container ricotta cheese
1/4 cup sugar
1 tsp. vanilla
Ground nutmeg or cinnamon (optional)
Preheat oven to 160C. Divide the 1/4 cup maple syrup among six 180ml custard cups; tilt custard cups to coat bottoms evenly.
In a bowl combine eggs, cheese, sugar, vanilla, and remaining teaspoon maple syrup.
Mix until well combined but not foamy. Place the custard cups in a 3L rectangular baking dish.
Divide egg mixture among custard cups. Sprinkle with nutmeg.
Place the baking dish on an oven rack.
Pour boiling water into the baking dish around custard cups to a depth of 2.5cm.
Bake for 40 to 45 minutes or until a knife inserted near the centres comes out clean.
Remove cups from water. Cool completely in custard cups. Cover and chill until serving time.
To unmold flans, loosen edges with a knife, slipping point of knife down sides to let air in.
Invert a dessert plate over each flan; turn custard cup and plate over together.
I was having a bit of a downer on the weekend and wasn’t feeling very zen so I decided to bake. Baking is my go to when I feel blue. Thankfully baking always gives me a feeling of accomplishment that helps me feel a little better. On the downside (?) I now have a houseful of baked goods and, as my husband is away, a limited audience to feed them too. On the upside I have a work colleague who could use a good feed who doesn’t mind eating the excess.
The downside of that today is that the excess was Mocha Cake. He doesn’t normally take caffeine, he had two pieces. So now he is talking incessantly about everything, his favourite colour, his new pink credit card, why I shouldn’t fertilize my garden in winter, the ninja turtles, the list goes on. By talking I mean, without taking a breath between words, a continual flow of non-information. Like my Mother would say ‘That boy could talk underwater with a mouthful of marbles’
Luckily for me he is fairly harmless and if the worst thing that happens to me today is that someone wants to talk to me, well, it’s a pretty good day.
Below is the recipe for that Mocha cake. Perhaps just let the kids have one piece and go outside to play.
Glazed Mocha Fudge Cake
185g butter
2 teaspoons vanilla essence
1 1/2 cups castor sugar
4 eggs, separated
3/4 cup self-raising flour
1/3 cup cocoa
3/4 cup plain yoghurt
3 teaspoons dry instant coffee
1 tablespoon boiling water
Mocha Glaze
60g dark chocolate
30g butter
1 teaspoon dry instant coffee
1 tablespoon water
3/4 cup icing sugar
Grease a 23cm square slab pan, line base with paper; grease paper.
Cream butter, essence and sugar in small bowl with electric mixer until light and fluffy; beat in egg yolks one at a time, beat only until combined.
Transfer mixture to large bowl, stir in sifted flour and cocoa and yoghurt, then combined coffee and water.
Beat egg whites in small bowl until soft peaks form, lightly fold through cake mixture in 2 lots.
Pour mixture into prepared pan, Bake in moderate oven for about 45 minutes.
Turn on to wire rack to cool. Top cold cake with glaze, decorate with walnut halves if desired. Refrigerate until glaze is set.
Mocha Glaze: Combine chocolate, butter and combined coffee and water in saucepan, stir constantly over low heat without boiling until smooth.
Remove from heat, gradually stir in sifted icing sugar.
I didn’t know what to expect from this recipe. I don’t much like the taste or texture of baked cheesecake and I was worried that this might be a bit similar so I didn’t hold out much hope that I would find this particular recipe to my tastes. How wrong can I be? Pretty damned wrong, it seems, is the answer to that.
This slice is light and moist and the cheese layer didn’t remind me of baked cheesecake at all. I enjoyed the toasty walnuts (but I love toasted nuts in general) and as it was not overly sweet or dense it wasn’t one of those slices where you say, it’s lovely but I could only eat a small slice. While you could easily cut this into minute squares and have it look fabulous served along with a high tea you can just as easily cut yourself a slab and plonk on the couch in front of the telly to enjoy with a cup of coffee.
I found the task of spreading the top layer of chocolate mix over the much softer and lighter layer of cheese filling a somewhat taxing task but other than that it was a fairly easy to follow recipe and I was very pleased with the result. My suggestion would be to make your cheese filling first and then hope that your chocolate mixture is still a bit warmer and softer than mine was when you get to your second layer.
Choc-Cheese Brownie Slice
185g dark chocolate, chopped
45g butter
2 eggs
3/4 cup castor sugar
1/2 cup plain flour
1/4 cup self-raising flour
few drops vanilla essence
1/2 cup chopped walnuts
Grease a 19cm x 29cm lamington pan.
Melt chocolate and butter over hot water, cool; do not allow to set.
Beat eggs in small bowl with electric mixer until thick, add sugar gradually, beat until sugar is dissolved.
Transfer mixture to large bowl, stir in sifted flours, essence and chocolate mixture.
Spread half the chocolate mixture into prepared pan.
Top with filling, then remaining chocolate mixture.
Run a knife in a zigzag pattern through mixture, sprinkle evenly with walnuts.
Bake in moderate oven for about 30 minutes.
Cool in pan before cutting.
Filling: Beat butter, essence and cheese together in small bowl with electric mixer until mixture is creamy.
Add sugar, beat until fluffy, add eggs one at a time, beat until combined.
Stir in sifted flour.
This post could have easily been titled ‘what the hell are they doing with our bananas?’
This is a popular rant with me lately and it doesn’t seem to be coming to any easy resolution, in fact the problem is getting progressively worse. It started a few years back with apricots and pineapples, then nectarines and peaches, then tomatoes and now finally bananas. Look, I realise that things always tasted ‘better’ when you were young and a lot of that is probably just a combination of poor memory and deteriorating taste receptors but I swear apricots used to be squishy and fragrant, not sour and hard like a golf balls, pineapples used to be aromatic and tasty, not green and scentless. Nectarines and peaches became hard and tasteless and tomatoes that used to be red and ripe are now sold like hard pink cricket balls. Now bananas are sold hard and green, worse yet they don’t ripen! They go brown but are still as tasteless as if they’d stayed green, you may as well eat the peel as eat the fruit, there is hardly a textural difference and the taste is the same. What the hell are they doing to our fruit?
There is this big push to eat more fruits and vegetables but frankly, why would you? It all tastes like Styrofoam and plastic wrap. I realise that the idea is to make them transportable and storable but should that be at the cost of them being edible?
Believe me, if we had an organic, fresh food grocer anywhere in my area I would be there doing my best to get something to eat that is both the correct colour and flavour, unfortunately I am stuck with what the big supermarkets make available to us. It’s no wonder I am obsessed with fitting as many vegetables into my small patch as possible, pity about the fruit though.
Anyway, now that you have sat patiently through my rant I will share with you the reason for my outburst and the recycling heading.
I bought some bananas a few weeks ago, they were yellow-ish (mostly they are sold bright green so I though this an improvement). Now weeks later they are brown, but still hard as rocks, and tasteless to boot. Okay, I’ll make a banana cake, maybe they will improve in flavour once cooked. No, no and no. A beautiful cake emerges from the oven, before it is even cool slices are cut and although it seems to lack that banana-ry scent there is still hope. No. No taste at all. Might as well have cooked the peels into the cake, so dissaapointing! Anyway, long story short the offending cake did not get eaten and sat, mouldering (not really) on the countertop.
Now I HATE wasting food so the search was on for something to do with leftover cake that doesn’t involve trifle (which I abhor!) I found the below recipe and tossed in some white choc-chips, and along with the vanilla something beautiful was born. Now in my opinion a bit of ginger in these would have made them spectacular but as it is, they are pretty darned good and an excellent way of using up left over cake, if you ever have such a thing in your house. I cut the sugar a bit, as I am wont to do. I froze some also (I have truckloads of them) and I am betting that it works out okay.
Another brownie recipe, subtly different to the last one, tasty in its own right. I am sure in this folder that I will come up with several more as the days go by. It interests me that a chocolate cake/slice can have so many variations and all of them are called the same thing. How to ever choose one special one out of all the contenders, one ‘go to’ recipe that you decide is best? I don’t know, I’ll leave that to the experts who will be walking in the door shortly and will vacuum up all evidence of my baking in no time flat. I ate one already, my only hope of trying one before they disappear. Slightly chewy, chocolaty with a hint of the vanilla coming through….not bad.
Again they were quick to make and as I used a rectangular tin they took less time than the recipe suggested, about 25 mins.
Brownies
Serves: 6
170 g butter, melted
1½ cups white sugar
1½ teaspoons vanilla
2 eggs
¾ cup flour
¾ cup cocoa powder
½ teaspoon salt
In a large mixing bowl, mix melted butter, sugar and vanilla.
Beat in eggs, one at a time.
Combine flour, cocoa powder and salt.
Gradually, blend the dry ingredients into the egg mixture.
Spread batter onto greased square pan.
Bake in preheated oven at 175°C for 40 minutes.(25mins in a rectangular tin)
Tim Tams, Australia’s great iconic biscuit favourite. Dare I admit that I don’t actually like them very much? I am not a great fan. Of course as a dyed in the wool chocolate fan, I wouldn’t knock one back if offered but it isn’t something I’d normally buy or hoard in a secret stash to be enjoyed as a guilty pleasure.
That said I purchased 2 packets recently because I found a Tim Tam cheese cake recipe and you have to try these things. Later in the week I went and bought another packet as my grazing family got to the Tim Tams before I had a chance to use them. After reinstating the ‘don’t touch anything in my baking basket’ rule I managed to buy a few more days grace (only with constant reinforcement) before I made the cheesecake over the weekend.
Needless to say a creamy, sweet, chunky chocolate cheesecake was a success. Very rich though, you only want a small slice at a time. If you are a Tim Tam fan you will enjoy this one, if you are not then it won’t thrill you to the core but is a perfectly pleasant experience all the same.
350 g Tim Tam biscuits
80 g butter, melted
375 g cream cheese, cubed and softened
½ cup caster sugar
1 teaspoon vanilla essence
1 cup thickened cream
3 teaspoons powdered gelatine, dissolved in ¼ cup boiling water
200 g white chocolate, melted, cooled
Place 250 g of the Tim Tams in a blender and process into fine crumbs.
Add the butter and process to combine. Press the mixture into spring-form baking pan and refrigerate 30 minutes.
Beat the cream cheese, sugar and vanilla with an electric mixer until smooth, then beat in the cream. Stir in the gelatine mixture and white chocolate.
Chop the remaining biscuits and stir into the cream cheese mixture then pour over the Tim Tam base.
Cover and refrigerate until set.
Confectionary is not something I have taken the time to thoroughly explore in a cooking sense. I dabbled a bit when I was younger but nothing since my teens really. Reason? Confectionary is so easy and cheap to buy, there just doesn’t seem to be an enormous point in making your own. Just occasionally though, a recipe looks like a winner and you find yourself having to try, regardless of the ease of buying something fairly good from the supermarket.
Now I have had many things sold to me under the guise of fudge, so many things in fact that I find that I am not even sure what fudge is. I have had every kind of crumbly, sugary, hard, brittle, soft, chewy, smooth, grainy confection sold to me as fudge and there seems to be no relation, one to another, excepting the high sugar content. I am not here to knock any of these products, they all had their attractions, some more than others, and I enjoy the convenience of being able to purchase decent confectionary easily.
This recipe though, makes me want to run out and start a confectionary company of my own. It MUST be shared with as many people as possible, it is really so good. As for texture, this little number is more reminiscent of a very soft toffee than anything else in my opinion, although this texture may change if you cook it a little longer than I did. Definitely a ‘store in the fridge’ confection. A tray is a whole lot of fudge when you are trying to find appropriate containers for the refrigerator but it disappears quickly (at least around me). You could just as easily leave the nuts out if you are not fond of them but I think they are a tasty addition.
Caramel Macadamia Fudge
125g butter
1 cup white sugar
1/2 cup brown sugar
395g condensed milk
2 Tbls liquid glucose
1 tsp vanilla
3/4 cup chopped macadamias
Line a 16 x 26cm pan with baking paper.
Place butter, sugars, milk and glucose on a small saucepan.
Stir over medium heat until melted.
Reduce heat to low and stir for 20 mins until thickened and a deep caramel colour.
Be careful mixture does not stick.
Stir in vanilla and macadamias.
Pour into tin and tap firmly to remove air bubbles.
Cool for 1 hr and refrigerate for a further 2hrs or overnight.
Cut into squares using a hot knife.
Singing the praises of a stodgy English pudding 🙂
This dish sounded interesting to me from the get go, particularly because I have bags of sliced and frozen bananas in the freezer waiting to be made into something sweet and gooey at the first opportunity.
This recipe reminds me (in texture) of many savoury English puddings but, of course, the flavour was something completely different. I expect that this would go very well with a good dollop of clotted cream or some good vanilla ice cream but it was very good just on its own. Although I followed the recipe on this one, I would suggest that there could have been less butter, it seemed a bit much to me, maybe half the amount would do? I used less sugar on top than the recipe called for, maybe 1/3 cup.
All in all a great way to use up bananas that are past their prime as long as you have a lot of eggs on your hands at the same time.
Baked Banana Pudding
6 servings
1 cup plus 3 tablespoons granulated sugar
6 Tbls all-purpose flour
6 large eggs
1 cup milk
2 Tbls vanilla extract
3/4 tsp salt
3 large bananas, cut into 1cm slices
3 Tbls butter, cut into bits
Preheat oven to 205C.
In a blender puree together 1/3 cup of sugar, flour, eggs, milk, vanilla and salt until mixture is smooth.
Arrange banana slices in one layer in a buttered square glass baking dish. Pour pudding mixture over bananas and bake on the middle rack of the oven for 20 minutes, or until the top is puffed and springy to the touch.
Sprinkle top with remaining sugar, dot with the butter and broil the pudding under a preheated broiler about 6cm from the heat for 1 to 2 minutes, or until it is browned.
By the way, as an infrequent indulger in caffeine, I will sing its praises to the heavens when it comes to helping treat long term migraines. It doesn’t always work for everyone but when it does it is like a unexpected blessing sent to ease your suffering. After 5 days of a debilitating migraine I ended up with a sugary caffeinated soft drink in my hand on the couch. Within minutes my symptoms eased. I should have thought of it earlier, I have suffered from migraines for years, but they don’t call it a fog for nothing. Sometimes it is hard to think around the pain.
Like I say, it doesn’t always work but when it does….there are just not words. It is certainly worth trying. For more on migraines click here for a good article to get you started. If you don’t suffer, it might help you understand friends or family that do, if you do, then it might give you some tips on how to cope.
Because of the following kinds of people, I felt the need to make something sweet. That and the fact that I had leftover pumpkin/sweet potato mash calling me from the refrigerator.
I know I am not alone in noticing this, and I can’t be alone in finding it very disturbing but the immediate escalation of nastiness in internet discussions is shocking to me. Is it the lack of face to face confrontation that makes people fly off the handle in ways they would never do normally or are there just those people out there that have little to no self-control and I have just been fortunate enough never to meet them? Silly things like you-tube videos and meme websites or more serious things like immigration debates on twitter, it doesn’t matter the forum, these people just lose it immediately and start throwing around words that decent people just don’t use in company.
It always seems to go thus:
Person 1: Here is my opinion, it may be ill considered and lack fore thought, but I am entitled to it.
Person 2: You are a stupid, ugly, fat $&*@%
Things degenerate from there, sometimes a thinking individual wades in trying to calm things down, in which case they cop a mouthful of abuse also, and it can go on for an age.
If these people are really so quick to anger and so unable to control their impulses I just hope to heaven that I never come across them by accidentally merging into traffic in a way that offends them. I may end up as a hood ornament or worse yet, a statistic. How do these people live day to day in the real world without getting the stuffing beaten out of them on a regular basis? Or are they able to relegate their lack of control to the computer room and act like a thinking part of normal society when they are in public?
I used to have a story book as a child with a picture of a troll inside, it was an ugly, mean, dirty, misshapen looking creature that was described as having little in the way of redeeming virtues. Not so surprising that this word has now been used to describe the type of person I am talking about here.
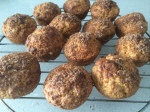
After being exposed to things like trolls we all need a little sweetness in our lives. Have a muffin…
Pumpkin Muffins
2 3/4 cups all-purpose flour
1 cup granulated sugar
1 tablespoon baking powder
1 teaspoon baking soda
1 teaspoon ground cinnamon
1/2 teaspoon salt
1 cup mashed pumpkin (I used a combination of pumpkin and sweet potato)
3/4 cup fat-free sour cream (I used Greek yoghurt)
1/3 cup fat-free milk
1/4 cup vegetable oil
1 teaspoon vanilla extract
2 eggs
Cooking spray
1 tablespoon granulated sugar
1 1/2 teaspoons brown sugar
Preheat oven to 190C.
Combine flour and next 5 ingredients (flour through salt) in a medium bowl, stirring with a whisk.
Make a well in centre of mixture. Combine pumpkin and next 6 ingredients (pumpkin through egg); add to flour mixture, stirring just until moist. Spoon the batter into 18 muffin cups coated with cooking spray.
Combine 1 tablespoon granulated sugar and brown sugar; sprinkle over muffins.
Bake at 190C for 25 minutes or until muffins spring back when touched lightly in centre.
Remove muffins from pans immediately; cool on a wire rack.